How to add a new staff bio
To add a new bio to your website we will use the same simple steps outlined in "How to edit a page" with a few extra steps. In this How-to we will be adding text content, an image and applying styles to format the look of the new bio.
Step 1
Sign in to the Content Management System (CMS) by clicking the Sign In link in the bottom right of your website. When you have securely logged in, your site is aware of who you are and what you have access to edit and create.
Step 2
Go to the Our Practice page just as you normally would.
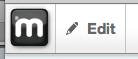
To start making changes to the page, click Edit in the editing tool bar located in the top left of the page. The page edit dropdown will open, select Edit this Page.
Notice that edit changed to editing and turned green in the tool bar. Your site is now in edit mode.
Step 3
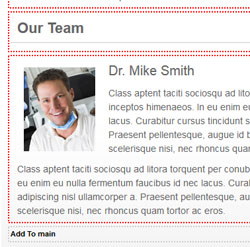
The page will reload with all of the areas you can edit highlighted in dotted red borders. In addition, any editable regions will highlight grey when you hover your mouse over the area.
Please note: Each bio has been placed in its own block. This helps keep the formatting and allows you to quickly change the order in which they appear. To add a new bio you will be adding a new content block to the page.
To add a new content block, click on the Add To main area bellow the last staff bio. This will open a new window with a list of options available in this region. Select Add Block, a new new window will open with all of the available block types that you can add. Select the second option from the top named Content.
The content editing interface will open. We are ready to start adding some new content.
Step 4
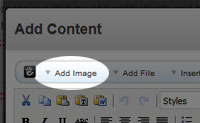
The first step will be to add a new picture. Click Add Image located in the top left corner of the content editing interface. This will open the File Manager. From the file manager we can upload a new image, resize the image and crop it to match the size of the existing bio pictures.
Please note: Cropping and resizing the image is not a mandatory step but it will help to maintain a clean and professional look for the page.

To upload your new image click the Choose File button located to the right of the Add Files(s) field. This will open a new file upload window, locate the new image on your computer and click Open. The window will close, returning you to the file manager. Next click the Upload File button (not the Upload Multiple). A new window will open confirming the upload. Click the green Continue button. Your image is uploaded and should now be showing in the file manager.
Step 5
We will now crop and resize our new image.
Please note: If you are comfortable with any image editing software you may crop and resize your images before uploading. The target size is 108px wide by 127px high.
Click anywhere in the new row created by the image you just added in the file manager. This will bring up a list of options, select Edit and a new window will open.
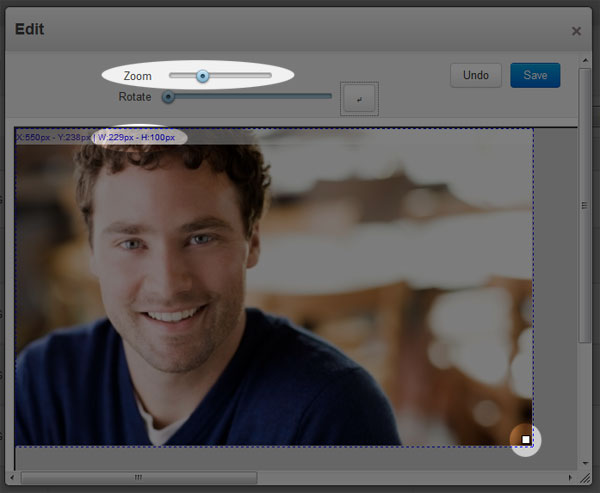
The edit window gives you a few very basic tools that we will use to crop and resize your image.
- 1. Zoom - This slider will be used to adjust the size of the image.
- 2. Width and height info - Indicates the width and height of the crop area.
- 3. Crop box - The dotted blue border that surrounds the image indicates where the image will be cropped. Using the white box in the bottom right of the image, you can drag to resize the crop box.
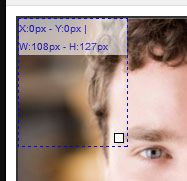
The first step will be to resize the crop box. Hover your mouse over the white box in the bottom right corner. Your mouse pointer will change to a diagonal line with an arrow at each end to indicate you are using the resize tool (Please note: If your mouse is hovering over the crop box it will change to an x with arrows. This tool is used to move the crop box). With your mouse on the white box and pointer showing the diagonal line tool, drag the box to resize the crop box. Keep a eye on the width and height information. Our goal is to resize the crop box to 108px wide by 127px high to match the existing images.
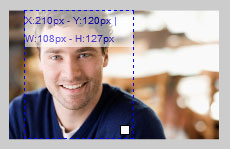
Next we will resize the image to fit into our newly sized crop box. To do this we will use the zoom slider. Use the slider to adjust the size of the image. As you change the size you may notice that the image is no longer within the area defined by the crop box. If you hover over the crop box, your mouse pointer will change to the x with four arrows. Click in the middle of the box and move the crop box over your image. Use the move tool and zoom tool together to line the image and crop box.
Click save, the window will close, returning you to the file manager. You have successfully cropped and resized your image.
Step 6
Now that the new picture is uploaded, cropped and resized, we can add it to the page. Click anywhere on the images row in the file manager. This will bring up a list of options, select Choose and the file manager will close and the image will be added to the content editing interface.
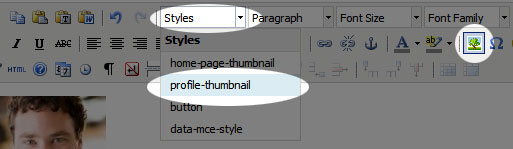
Next we will apply a style to the new image to match the formatting of the existing images. Click on the image, the picture icon in the tool bar will be highlighted indicating the image is selected. Click on the Styles dropdown menu in the tool bar and select profile-thumbnail. The style will be applied to the image.
Step 7

Now we can add the copy. Click to the right of the profile picture and enter (type or paste) your new biography.
Please note: The three clipboards in the upper left corner of the editing interface give you a few options for pasting text. If you are pasting from MS Word, click the clipboard with the Word icon. This will help strip the text of any formatting that may carry over from Word.
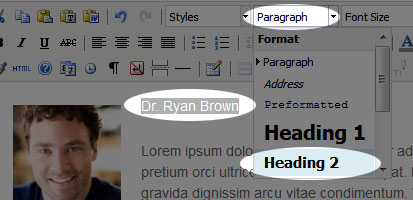
Once your text is entered the last step is to format the heading. Highlight the name of the new staff member, click the Paragraph dropdown menu in the tool bar and select Heading 2.
Click Add and the content editing interface will close, returning you the the web page in edit mode.
Step 8
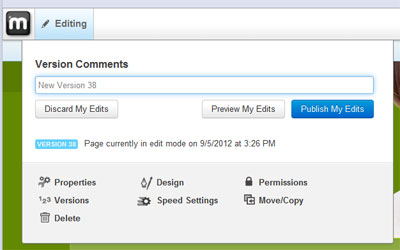
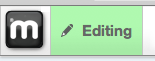
The final step to completing your edit is to publish your changes and make them visible to your visitors. To do this, click on the green Editing button in the top left of your screen. The Editing menu will open with three options.
- 1. Discard My Edits - Throw away all the changes you just made and revert to the last published version.
- 2. Preview My Edits - Save these edits as a new version, but do not publish. When logged in you will see this most recent version, but regular site visitors will only see the last published version.
- 3. Publish My Edits - Save your edits, and make them live for all visitors to see.
Once you are happy with your changes, click Publish My Edits and you're done!