How to add a page
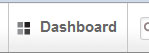
Adding a new page to your website only takes a few clicks. However, for a better understanding of how your website is organized, lets start with a quick look at the file structure of your site. You can see what your site's architecture looks like by signing in and clicking on the Dashboard button located on the right of the editing tool bar at the top of your page. This will open the Dashboard. To see the files that make up your website click on Full Sitemap located in the list under Sitemap.
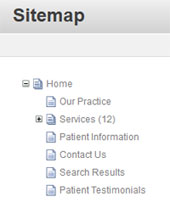
In the sitemap window you can see how your site is arranged. You will see all the pages of your site represented with a page icon and the name of the page. The pages are listed in the order that they appear in your sites main navigation menu. If a page has any sub-pages, you can expand or collapse the list with the + or - located to the left of the page icon.
From the sitemap, clicking on a page name allows you to access some of the same options available from the Edit button when working in a webpage view. One important option to take special note of is the ability to rearrange the order of the pages, ultimately changing their order in your sites main navigation. By hovering over a pages (page) icon, your mouse pointer will change to an X with four arrows. To move a page, simply click your mouse on a pages icon and drag it to a new location within the list. Moving a page this way will not break any links within the page, all element will be automatically updated by the CMS.
Step 1
Now that we've looked at how the pages of your website are organized, lets dive into adding a new one. In this How-To we will add a new sub-page under Services. If you've followed the steps outlined above and are still on the sitemap page, click the Return to Website button in the top left of the editing tool bar. If not, sign in to your website.
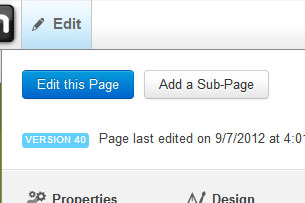
To get started, navigate to the Services page of your site and hover over the Edit button in the editing tool bar at the top of the page. The page edit menu will open with two buttons at the top of the window, Edit this Page and Add a Sub-Page. Click Add a Sub-Page.
Please note: Clicking Add a Sub-Page when on the Homepage will add a new link to the main navigation menu. Clicking Add a Sub-Page while on any other page will add a new link in a dropdown under the "parent" link in the main navigation. Your sites menu is limited to one level of sub-navigation. A sub-page added to another sub-page will not show up in the navigation.
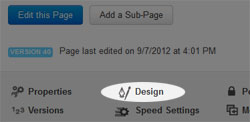
A new widow will open asking you to choose a page type. Page types will vary slightly depending on your desing template. The page type can be changed at any time using the Design link in the page edit dropdown menu.
Click on a page type and a new window will open. Here we can assign the following information about your new page.
- 1. Name - The page name that will be used in the navigation.
- 2. URL Slug - This field will automatically generate a search engine friendly URL (eg. www.yoursite.com/new-page.com).
- 3. Public Date/Time - A record of when the page was created.
- 4. Description - A brief description used for searching and summarizing the page.
Fill out all fields and click Add Page.
Step 2
We are now looking at a new page in edit mode. Depending on your design template and the page type you choose some areas may be populated with content. Feel free to experiment with the different page types as outline above.
To start adding content we will be adding a new content block to the page. You can add blocks to any area highlighted in dotted grey borders with "Add To" followed by the name of the area (eg. main).
To add a new content block, click on the Add To main area. This will open a new window with a list of options available in this region. Select Add Block, a new window will open with all of the available block types that you can add. Select the second option from the top named Content.
The content editing interface will open. We are ready to start adding some new content.
Step 3

Now we can adding some content. Click in the content editing interface and enter (type or paste) your new content.
Please note: The three clipboards in the upper left corner of the editing interface give you a few options for pasting text. If you are pasting from MS Word, click the clipboard with the Word icon. This will help strip the text of any formatting that may carry over from Word.
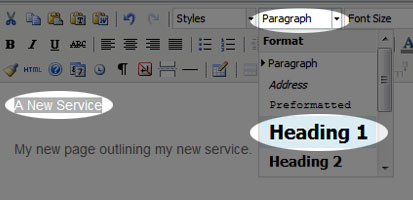
Once your text is entered the next step is to format the text to match the existing pages. Highlight the header or title of your new page, click the Paragraph dropdown menu in the tool bar and select Heading 1. Heading 1 is used on the main title of each page and heading 2 is used on sub-headings.
If you would like to include an image with your new content, please refer to the Add an image How-To.
When you're happy with your new content, click Add and the content editing interface will close, returning you the the web page in edit mode.
Step 4
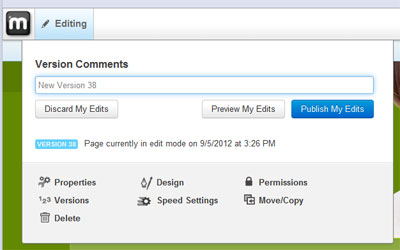
The final step to completing your edit is to publish your new page and make it visible to your visitors. To do this, click on the green Editing button in the top left of your screen. The Editing menu will open with three options.
- 1. Discard My Edits - Throw away all the changes you just made and revert to the last published version.
- 2. Preview My Edits - Save these edits as a new version, but do not publish. When logged in you will see this most recent version, but regular site visitors will only see the last published version.
- 3. Publish My Edits - Save your edits, and make them live for all visitors to see.
Once you are happy with your changes, click Publish My Edits and you're done! A new item will be added to the bottom of the dropdown menu under Services.