How to edit your websites testimonial stack
Some of our design templates display a few "teaser" testimonials with a button to read more in the sidebar or footer and appears on multiple pages throughout your website. This section is controlled using stacks. Simply put, a stack is a block of content (or combination of blocks) that can be reused in multiple places on your site. When you edit a stack the changes are applied to every instance of that stack. So, in this case you can choose a few of your best testimonials, add them to the testimonials stack, and the changes will be applied site wide. This functionality saves you from having to update every page that includes a teaser testimonials.
Step 1
Sign in to the Content Management System (CMS) by clicking the Sign In link in the bottom right of your website. When you have securely logged in, your site is aware of who you are and what you have access to edit and create.
Step 2
Navigate to any page that includes the teaser testimonials.
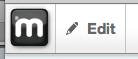
Put the page in edit mode by clicking Edit in the editing tool bar located in the top left of your page. The page edit dropdown will open, select Edit this Page. Edit will change to Editing and turn green, indicating the page is now in edit mode.
Step 3

The page will reload with all of the areas you can edit highlighted in dotted red borders. Please note that areas using stack functionality are highlighted with dotted DARK RED borders.
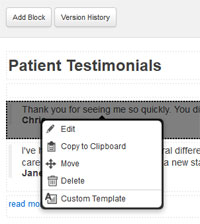
To begin editing, simply hover over the testimonials area and press your mouse button. This will bring up a list of options. Select Manage Stack Contents and the Patient Testimonials stack will open. You are now viewing the blocks that make up this stack.
Please note: Just like the testimonials PAGE, each testimonial has been placed in its own block to help keep the formatting and allow you to quickly change the order in which they appear.
Step 4
From here you have a few options to choose from. You can add a new testimonial and/or edit, rearrange and delete existing testimonials.
To edit existing testimonials, click on the block you want to edit to access the following options.
- 1. Edit - Opens the content editing interface for the selected area. Choose this option if you just want to update an existing testimonial.
- 2. Copy to Clipboard - Copies the content of the selected area to the clipboard. Not really applicable for this specific situation.
- 3. Move - Easily drag and drop to reorder the blocks. Choose this option if you want to change the order the testimonials appear in.
- 4. Delete - Deletes the selected block. Choose this option if you want to delete a testimonial.
To add a new testimonial, click the Add Block button located in the top right corner of the stack interface. A new new window will open with all of the available block types that you can add. Select the second option from the top named Content. The content editing interface will open. Enter (type or paste) your new testimonial.

Please note: The three clipboards in the upper left corner of the editing interface give you a few options for pasting text. If you are pasting from MS Word, click the clipboard with the Word icon. This will help strip the text of any formatting that may carry over from Word.
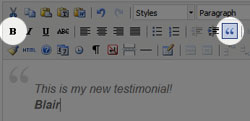
Now we can format your new testimonial. You should now have a testimonial followed by a name. To place the name directly under the testimonial without a space, use a soft return (hold Shift and press Enter). Next, bold the name by highlighting the text and clicking the B in the tool bar. Now add the quote marks by highlight all of the text (testimonial and the name) and clicking the quote marks in the tool bar.
Click Add and the editing interface will close.
Step 5
The new block containing the testimonial you added should now show at the bottom of the Patient Testimonials stack. Now we need to move the new block above the read more button. Click on the new block and select Move, then click and hold the new block, dragging it to the desired location in the stack. Release the mouse button and your done.
Step 6
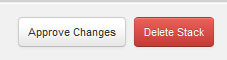
Once you are happy with your changes, click Approve Changes in the top right of the stack interface and you're done! To close the stack interface and return to your website, click Return to Website in the top left of the browser window.